How to Clean a Burnt Stainless Steel Pan Without Scratching It
As an Amazon Associate we earn from qualifying purchases. Some links on this page are affiliate links, which means we may earn a small commission if you make a purchase.
Scrubbing across the grain of a brushed stainless steel surface embeds abrasive particles and creates micro-scratches that trap future residue. This same principle applies to cleaning burnt pans: the direction of your cleaning motion matters as much as the tool you choose.
You’ve lifted the lid and there it is: a black crust fused to the base of your stainless steel saucepan. Your first instinct might be steel wool. Don’t. That burnt-on carbon is a chemistry problem, not a force problem, and tackling it with abrasion on a dry pan is exactly how you scratch stainless steel permanently. The good news is that the same pan, handled the right way, may come clean without scratching the surface.
Stainless steel is hard, but its polished finish can be gouged. When you scrub dry residue with an abrasive pad, the food particles work like sandpaper against the metal—every pass cuts a little deeper. The fix is straightforward: wet the surface first. Water and washing-up liquid create a lubricating layer that reduces friction, letting a bicarbonate paste lift the burnt food rather than grind it into the surface. The goal is to dissolve and lift the burnt layer, not to sand it down.
This approach works on the lightest discoloration right up to a pan that’s been through a few too many high-heat experiments. Here’s how to do it properly.
Understanding Stainless Steel’s Vulnerabilities
Think of it like washing a dirty car. A dry sponge drags grime across the paintwork and leaves fine scratches. A wet sponge with proper wash solution floats the dirt away. A burnt stainless steel pan works similarly—burnt residue can often be loosened by soaking and gentle cleaning once you provide the right conditions.
📺 Watch: Cleaning Burnt on Mess in a Stainless Steel Pot
The polishing on stainless steel is what gives it that characteristic shine, and it’s thinner than people assume. A single session with steel wool or a scouring pad can scratch or dull the polished surface. Once the micro-grooves are there, no amount of cleaning brings the surface back—you’ve traded a cosmetic problem for a permanent one. The makers’ own guidance is consistent: Tefal explicitly warns against steel wool, steel brushes, and scratchy cleaners on polished stainless steel. That’s not a marketing position; it’s the practical reality of how the material behaves.
Soak before you scrub. Paste before you press. Let the chemistry do the work.
The 5-Step Maker-Backed Workflow
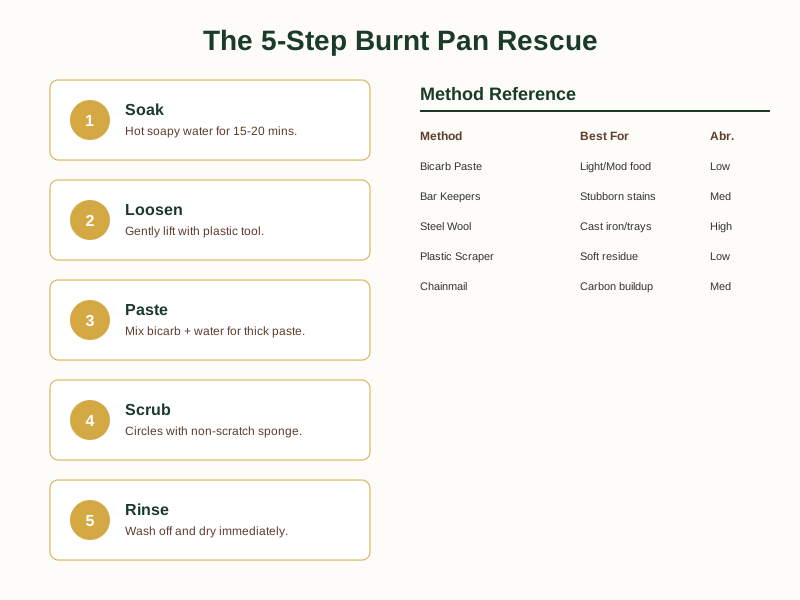
This is the order of attack for burnt stainless steel, and it is worth checking your maker’s care page too. The steps build on each other—don’t skip to the scrubbing stage, because every stage before it makes the next one easier.
Step 1 — Soak. Fill the pan with hot water and a good squirt of washing-up liquid. Leave it for 15–20 minutes. This softens the burnt-on food layer and starts to break the bond between the carbon and the metal. If the pan is very badly burnt, some guidance suggests bringing the water to a simmer, letting it cool in the pan, then washing—the heat cycle does a lot of the work before you touch it with anything.
Step 2 — Loosen. Use a wooden spoon, silicone spatula (paid link)See on Amazon, or plastic scraper to gently lift any food that’s already starting to separate. Do not press hard. If something doesn’t budge after the soak, leave the pan to soak longer—it’s not ready yet.
Step 3 — Make a paste. Mix bicarbonate of soda (paid link)See on Amazon with a small amount of water to form a thick paste. Bicarbonate of soda can help lift burnt residue when used gently.
Step 4 — Apply and scrub. Spread the paste over the affected area and work it with a non-scratch sponge, using small circular motions. The bicarb does the lifting; you’re just providing the movement. Rinse the sponge frequently so you’re not redepositing grit. For residue that won’t shift, a plastic pan scraper (paid link)See on Amazon can help lift the softened layer without touching the metal.
Step 5 — Rinse and dry. Rinse the pan thoroughly with clean water to remove every trace of paste, then dry it immediately with a tea towel. Leaving stainless steel to air-dry often results in water spots, which are fixable but unnecessary.
If the burn is very old or very heavy, you may need to repeat steps 3 and 4 once or twice. The pan will get there—patience is the ingredient that never runs out.
Now you know what to look for—Download the Free Pan Rescue First-Steps Checklist to keep the steps to hand at the sink.
Choosing Safe Cleaning Tools
Not all cleaning tools are equal on stainless steel. Here’s the honest rundown.
Non-scratch sponge is the safest everyday option. Use the soft yellow side on polished stainless; avoid the green scouring side entirely. The green side of a standard scourer can leave permanent marks on new stainless pans—it’s designed for cast iron and oven trays, not polished cookware.
Plastic scrapers are excellent for lifting softened residue without making contact with the metal surface. They’re cheap, last for ages, and do a job that nothing else does as well on delicate finishes.
Chainmail scrubbers are genuinely effective at lifting carbon, and on cast iron they work with relatively little effort. The silicone-handled versions offer better grip and control. The caveat: they’re best suited to cast iron and carbon steel. On polished stainless steel, using one dry or with too much pressure can leave fine marks—use them with plenty of soap and water if you reach for one on stainless.
Bar Keepers Friend (paid link)See on Amazon and The Pink Stuff are cream cleaners that tackle stubborn stains on stainless steel effectively. Bar Keepers Friend is marketed for cleaning stainless steel according to product instructions. The trade-off is that both products are abrasive enough to dull a polished finish if used aggressively or too often. Test on a hidden area of the pan first, use sparingly, and rinse thoroughly. Bar Keepers Friend has a noticeable smell, so open a window. Neither is a daily driver—they’re for the jobs that bicarb can’t quite manage on its own.
The honest summary: non-scratch sponges and plastic scrapers are the default tools for stainless steel. Everything else is for when the default isn’t enough, used with the awareness that each step up in abrasiveness is a small calculated risk to the finish.
When Replacement Becomes Necessary
A stainless steel pan can last for many years with proper care. But there are a few situations where no amount of cleaning will bring it back, and knowing when to stop is part of looking after your kitchen properly.
Warping is the clearest red flag. If the base of the pan no longer sits flat on the hob—you can feel it rocking—the metal has been stressed by excessive heat or thermal shock (cold water on a very hot pan). A warped base may affect contact with the hob and cooking performance. That one’s retired.
Non-stick coating damage doesn’t apply to plain stainless steel, but many stainless pans have a non-stick coating on the cooking surface. If that coating is peeling, blistering, or flaking, consider replacing it and follow the maker’s guidance on this, as coatings and their care requirements vary.
Deep pitting or corrosion is different from surface staining. If the surface feels rough and uneven—not just discoloured, but physically eaten into—the metal itself has been compromised. Surface staining lifts with bicarb; pitting doesn’t.
If cleaning hasn’t improved the pan after the full workflow above, that’s the honest answer. Work through the sequence: bicarb paste first, then a non-scratch sponge, then a plastic scraper for the stubborn bits, then a cream cleaner if needed. If none of those moves the problem, you’ve found your answer.
Manufacturers advise against harsh or abrasive cleaners on stainless steel cookware. Stick to bicarb and washing-up liquid, or a cream cleaner specifically formulated for stainless steel, used strictly by the label. While many manufacturers permit dishwasher use, hand washing in warm soapy water is the better choice if you want the pan to keep looking its best for the longest time. For specific concerns like heat discolouration, diluted vinegar is generally safe for stainless steel and can help with hard water marks, provided you rinse thoroughly afterwards and avoid using it on any pan with a non-stick or enamel coating unless the maker specifically permits it.
Comparing Cleaning Methods
| Method | Best For | Abrasiveness | Tool Required |
|---|---|---|---|
| Bicarbonate Paste | Light to moderate burnt-on food | Low | Non-scratch sponge |
| Bar Keepers Friend | Stubborn stains and discolouration | Medium | Non-scratch sponge |
| The Pink Stuff | Stubborn stains and discolouration | Medium | Non-scratch sponge |
| Steel Wool | Cast iron and oven trays | High | Steel wool pad |
| Green Scourer | Cast iron and oven trays | High | Green scouring pad |
| Plastic Scraper | Softened residue | Low | Plastic scraper |
| Chainmail Scrubber | Carbon buildup on cast iron | Medium | Chainmail scrubber |
Making the Grain-Direction Rule Your Habit
The grain-direction rule—cleaning with the material’s natural flow rather than against it—is the one habit that prevents recurring cleaning problems. Most burnt stainless steel pans are dirty, not dead. The difference comes down to method: soak, paste, and wet-scour rather than dry-scrub and force. The five-step workflow—soak, loosen, paste, scrub, rinse—works because it works with the material rather than against it. Bicarbonate of soda and a non-scratch sponge do the heavy lifting; elbow grease is the last resort, not the first instinct.
The next time you lift a lid to find a black crust staring back at you, you’ll know exactly what’s happening and exactly what to do about it.
Got the pan clean? Download the Free Pan Rescue First-Steps Checklist and keep it somewhere you’ll find it when you need it.
For other stainless steel care topics, see our parent guide: How to Clean a Burnt Pan: Stainless Steel, Aluminium and Pots .
Sources & Further Reading
- How to Clean a Burnt Pan: easy Methods That Actually Work
- How to Clean Stainless Steel Cookware | Le Creuset UK
- How to Clean a Burnt Stainless Steel Pan - Made In Cookware - UK
Note: General guidance only, verify details with a qualified professional or official source.