Does Bicarbonate of Soda and Vinegar Actually Clean a Burnt Pan?
As an Amazon Associate we earn from qualifying purchases. Some links on this page are affiliate links, which means we may earn a small commission if you make a purchase.
When acetic acid in vinegar meets sodium bicarbonate, they neutralise each other instantly, releasing carbon dioxide bubbles. This chemical reaction looks impressive in a burnt pan, but the fizz does almost no mechanical cleaning work on carbonised food—the CO₂ release is too brief and gentle to dislodge stubborn residue. The real cleaning comes from the acid and heat working before the bicarb is added.
You’ve scraped the pasta sauce out, run it under the tap, and the black crust at the bottom of your stainless saucepan hasn’t budged. The cupboards are bare of cleaning products. All you have is the vinegar you use for the windows and the bicarbonate of soda (paid link)See on Amazon left over from making cakes. You’ve seen the trick online—pour both in, watch it fizz, and the burnt food lifts off like magic.
So why does the sink look like a science experiment and the pan look the same?
The fizz trick has a specific purpose, but it’s not doing what most people think. The order you add things matters more than almost any guide will tell you.
This is what the pan actually needs, and when to skip the cupboard fix entirely and look for a replacement instead.
Why the “Fizz” Doesn’t Clean Like You Expect
Most online guides suggest mixing vinegar and bicarbonate of soda and pouring the lot into the pan. It looks impressive. It sounds like chemistry in action. It does almost nothing useful for cleaning burnt-on food.
📺 Watch: quick tip, clean a burned pan with baking soda, how to diy
Here’s why. When you mix them together first, the acetic acid in the vinegar reacts immediately with the sodium bicarbonate. They neutralise each other in seconds, producing a short burst of CO₂ bubbles—the fizz. That’s the reaction doing its job, but its job is just that: fizzing. The acid gets used up before it touches the burnt food, and the bicarbonate is spent neutralising it rather than cleaning. What you’re left with is salty, slightly acidic water and a pan that still has carbon baked onto the base.
The fizz isn’t dissolving the burnt food. It can lift it—but only if the ingredients are used in the right sequence.
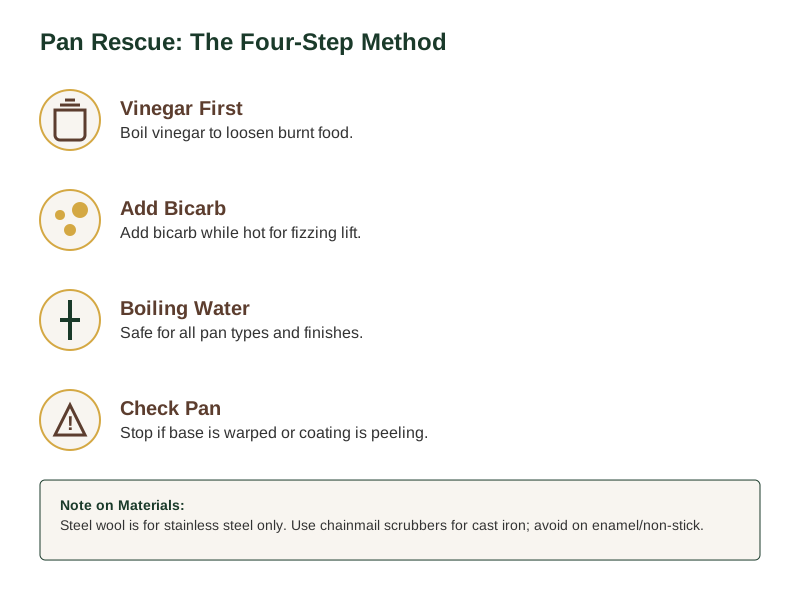
The correct order is: boil the vinegar first, then add the bicarb. Boiling vinegar (diluted with water, roughly equal parts) deglazes the mineral and protein bonds that hold burnt food to the metal surface. The heat does the work. Then, once you’ve pulled the pan off the heat and the vinegar is still hot, you add the bicarbonate. The bicarb reacts with the residual acid that hasn’t yet been diluted or evaporated, producing CO₂ bubbles that physically lift the softened debris. The fizz is a lift, not a dissolve—and it only works if there’s still acid left to react with. It is not effective to put vinegar and bicarb in the pan at the same time, as this causes them to react with each other before either touches the burnt food.
Saga’s care guide notes this sequence explicitly. Bosch’s published method also uses equal parts water and vinegar, boils the mixture, and then adds baking soda.
One important caveat before you reach for the vinegar: this method is for stainless steel and bare cast iron. If you have an enamelled surface, vinegar’s acid can dull the gloss over time. Some manufacturers advise caution with acidic cleaners on enamel finishes.
Boiling Water: The Reliable Alternative
A commonly recommended method is to boil water with a splash of washing-up liquid, let it simmer for a few minutes, then scrape with a plastic scraper (paid link)See on Amazon.
This relies on thermal expansion—heat makes the metal and the burnt carbon expand at slightly different rates, loosening the bond between them. The washing-up liquid reduces surface tension and helps the water get underneath the residue. It’s physical, not chemical, which means there’s nothing to neutralise and minimal risk to pan finishes when used appropriately. Boiling water is generally safe for intact, manufacturer-approved non-stick pans when not overheated or boiled dry; what typically damages non-stick is abrasive scrubbers, metal utensils, and thermal shock (cold water on a very hot surface).
Bosch’s guide to cleaning a burnt pan backs this approach, recommending a soak and a non-abrasive scraper. The advantage is that it’s generally compatible with stainless steel, enamel, and non-stick pans when used according to manufacturer instructions.
The tool matters as much as the method. A plastic scraper—the kind with a flat silicone edge—will get under the loosened residue without scratching the surface. Metal spatulas, steel wool, and abrasive scouring pads can leave micro-scratches on stainless and will destroy a non-stick coating. While steel wool can remove burnt residue from stainless steel, it may leave micro-scratches that could make the pan more prone to sticking in future. For cast iron and carbon steel, a chainmail scrubber may help remove residue while preserving seasoning when used gently, but it is material-specific: don’t use it on enamel or non-stick.
If the pan has a non-stick coating, the rules tighten. Hot water, washing-up liquid, and a soft sponge are typically recommended.
Choosing Your Approach
Both methods work in different situations. The right choice depends on what you’re dealing with and your pan’s material.
The vinegar-and-bicarbonate method wins on budget and accessibility. It does genuinely lift lighter burnt-on residue if you follow the sequence (vinegar first, boil, then bicarb while still hot). But it adds variables: acid concentration, temperature, timing, and potential concerns with enamel surfaces. For heavy carbon build-up, it often falls short.
The boiling-water method wins on reliability and broad compatibility. It works on stainless, enamel, and non-stick. It needs no special ingredients. Because it relies on heat and physical scraping rather than chemistry, there’s less that can go wrong with the pan’s finish. The trade-off is that it requires a plastic scraper and some patience.
For most situations: start with boiling water and a plastic scraper. It’s the default that minimises risk to your pan. If that doesn’t shift the residue, move to the vinegar-then-bicarb sequence as a second attempt, but expect to scrub a bit more. If both fail on a heavy build-up, the carbon may be too far gone for home methods.
Need a quick reference for what to try first? Download the Free Pan Rescue First-Steps Checklist —it covers the sequence for each pan type in plain steps.
Recognising When to Replace Rather Than Clean
This is the most important question to answer before you spend ages scrubbing a pan that won’t come back.
📺 Watch: How to clean a burnt pan in SECONDS
The distinction is between surface residue and structural damage. Burnt carbon, brown staining, and mineral scale are surface problems—they’re dirty, not dead. However, some damage indicates the pan may be finished.
Warning signs that mean stop:
- Pitting or etching in stainless steel—the metal surface has been eaten away by sustained high heat or acidic food. Cleaning won’t rebuild it.
- Bubbling or flaking enamel—this can happen from overheating or from a manufacturing fault. Contact the manufacturer for advice, especially for interior chips or exposed metal.
- A warped base—a warped pan won’t sit flat on the hob, which means uneven cooking and hot spots that burn food repeatedly. You can feel this by sliding the pan on a flat surface; if it rocks, it’s gone.
- A peeling or deeply scratched non-stick coating—once the coating is compromised, you’re cooking on whatever’s underneath, and the non-stick performance is lost.
If the pan is new and expensive, check the manufacturer’s warranty before giving up on it. Some brands may replace pans with manufacturing defects—it’s worth checking before you reach for the scraper.
Comparing Cleaning Approaches
| Method | Best For | Surface Compatibility | Key Requirement |
|---|---|---|---|
| Vinegar & Bicarb | Light residue | Stainless steel, bare cast iron | Correct order: boil vinegar first, then add bicarb while hot |
| Boiling Water | Heavy residue, all materials | Stainless, enamel, non-stick | Plastic scraper, washing-up liquid, patience |
| Steel Wool | Stubborn burnt-on food | Stainless steel only | Risk of micro-scratches and future sticking |
| Chainmail Scrubber | Rust removal | Cast iron, carbon steel | Material-specific, avoid enamel and non-stick |
Understanding when the vinegar-bicarbonate reaction helps is key: it’s genuinely useful for loosening light mineral deposits where the fizz can work effectively. But for carbonised food, the chemical reaction does almost no mechanical cleaning—the real work comes from the heat and acid applied before the bicarb is added. This distinction gives you a simple rule: use the sequence for mineral buildup, but for burnt-on food, start with boiling water and a plastic scraper as your default approach.
The real win is knowing when the pan needs a clean and when it needs replacing. If the base is warped, the enamel has bubbled, or the non-stick coating is flaking, no amount of vinegar and bicarbonate will bring it back. A clean pan and a new pan are both better outcomes than a long session of scrubbing a pan that’s past saving.
You’ve got the sequence now. Download the Free Pan Rescue First-Steps Checklist to keep it somewhere you can find it before the next time it happens—and it will happen, because it happens to everyone.
Related Guides
For a complete overview, see our How to Clean a Burnt Pan: Stainless Steel, Aluminium and Pots .
Sources & Further Reading
- How to clean a burnt pan | Bosch UK
- How to Clean a Burnt Pan: easy Methods That Actually Work
- How To Clean Burnt Pots and Pans - Marigold UK
- How to clean a burnt pan: expert tips on fixing the damage - Saga
- How to Clean Burnt Food Off Any Pan - Circulon UK
Note: General guidance only, verify details with a qualified professional or official source.